Cartesian Printers
*This is a work in progress, so bare with me…*
Welcome to the Setting up Replicape for Cartesian Printers How-To!!
First off, if this is your first printer, or maybe the first printer you’ve built yourself, please just take your time and don’t frustrate yourself. If you thought you were going to be printing on the first day or even the first week, I hate to break the news, but there is a learning curve involved. Try to have fun, and don’t hesitate to check in over at: Slack and Google+ if you need some real-time help.
- I’m hoping you have figured out how to wire your steppers, end stops, fans, heaters, etc… I also hope you know your way around Cartesian space… from this point on, just remember that on your Cartesian printer, the front left corner of your build plate is X ‘zero’, and Y ‘zero’ (0,0)… and when the tip of your hot end is touching your build plate your Z axis is at ‘zero’…
- When you first turn on your printer, the system is going to think it’s sitting at X ‘zero’, Y ‘zero’, Z ‘zero’ until it homes to it’s endstops, so until we have the correct configuration, let’s only make careful moves with the software.
- Setting up your printer will require accuracy, so if you don’t have a digital caliper on hand, I suggest you stop right now and grab one.
OK! So if your printer is wired up, and you have the software flashed, let’s get started!
Configurations
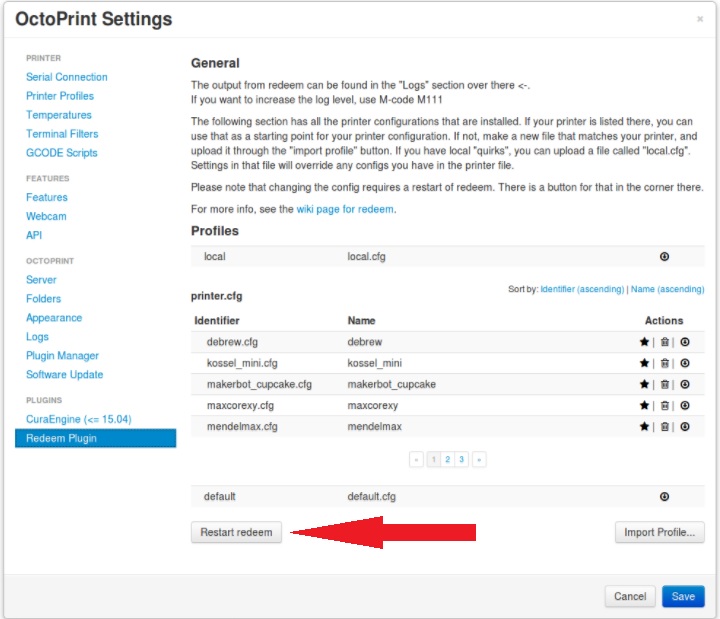
Let’s open Octoprint and check out the Profile Configurations which are located in These guys are what tells Redeem (the software) everything it needs to know about your printer. At the bottom you’ll see Default.cfg… Click on the little eyeball and check out all of the commands in that file. This configuration contains all of the necessary commands that tells the software the size of the printer, how much power to send to your steppers, how fast it can move, and how slow, just to name a few… Ok, close that window… above Default.cfg, you’ll see Printer.cfg… these particular configurations are tweaked for specific printers, and whatever is written to this configuration will override the commands within the Default.cfg… if you have a name brand printer or a similar clone, you can choose the configuration that matches your printer by clicking the star symbol and make it your default Printer Profile. This could get you to third base with setting up your printer! You may have noticed that you can’t edit the commands in your Default.cfg and Printer.cfg… that’s where the Local.cfg up top comes in. What? There’s nothing in that profile? You’re right! This is where you get to add commands to the configuration… and this configuration overrides the Printer.cfg, and the Default.cfg, so now I hope you’re seeing the “hierarchy” of the configurations… Local.cfg > Printer.cfg > Default.cfg…
As I noted before, if your printer is a name brand or clone of a certain printer brand, you can go ahead and make one of the Printer.cfg profiles your default by clicking the star on the particular profile you want to use.
Whenever you make any changes to Redeem, you will need to restart Redeem by clicking the *Restart Redeem* button below the profiles or from the *System* tab at the top of Octoprint. Your changes will not take effect until you do so.
Using Printer.cfg
If you’re planning to use a Printer.cfg profile as your default, you can restart Redeem as mentioned above and move on to the Checking your configuration section to see if the configuration works as it should. However, I suggest reading through the following section to get a better understanding of the bits and pieces of the configuration. Chances are, you’ll need to make adjustments to the entries explained in the next section anyways.
Setting up your Local.cfg
So now that we’ve discussed the three levels of configurations, let’s get started with editing your Local.cfg! Setting up your Local.cfg can get pretty complicated, but for now, we’re just going to get your printer moving normally, homing correctly, and stopping where it’s supposed to… once you’ve got your feet wet, and maybe waste deep, you’ll eventually need to dive into some deeper water to get your printer tweaked for maximum performance… I’ll tell you where to go at the end of this How-To.
Copy and paste the following commands within the text block to your local.cfg.
[Steppers]
# steps per mm:
#   Defined how many stepper full steps needed to move 1mm.
#   Do not factor in microstepping settings.
#   For example: If the axis will travel 10mm in one revolution and
#                angle per step in 1.8deg (200step/rev), steps_pr_mm is 20.
steps_pr_mm_x = 4.0
steps_pr_mm_y = 4.0
steps_pr_mm_z = 50.0
steps_pr_mm_e = 6.0
steps_pr_mm_h = 6.0

# Which steppers are enabled
in_use_x = True
in_use_y = True
in_use_z = True
in_use_e = True
in_use_h = True

# Set to -1 if axis is inverted
direction_x =  1
direction_y =  1
direction_z =  1
direction_e =  1
direction_h =  1

# A stepper controller can operate in slave mode,
# meaning that it will mirror the position of the
# specified stepper. Typically, H will mirror Y or Z,
# in the case of the former, write this: slave_y = H.
slave_x =
slave_y =
slave_z =
slave_e =
slave_h =

[Endstops]
has_x = True
has_y = True
has_z = True
invert_X1 = False
invert_Y1 = False
invert_Z1 = False
end_stop_X1_stops =
end_stop_Y1_stops =
end_stop_Z1_stops =

# Example: end_stop_X1_stops = x_neg ``\ *``or``*\ `` x_pos ...
[Homing]
home_x = 0.0
home_y = 0.0
home_z = 0.0
home_e = 0.0
home_h = 0.0
Checking your Configuration
Endstops
The first thing we need to do is make sure your endstops are working correctly… to do this, all you need to do is go into Octoprint and open the Terminal. When you press in your endstop switches, you should see a message in the terminal that displays which end stop was hit. If you’re not seeing this message, then you need to go back to your Local.cfg and scroll down to [Endstops]… change the invert command for that stepper from False to True… Restart Redeem, and reopen the Terminal. Physically press the endstop switch again and see if the message appears. If not, check that you have wired the switch correctly.
Stepper Direction
* If you have two steppers on one axis, then you will need to either use a Y-cable or set up *H-axis* as the slave for that axis… my suggestion is to set up one stepper at a time. Once you have one stepper working correctly, you can unplug it from the board and connect the slave stepper to the *H-axis*…
Open your Terminal and enter M18… Physically move your XY gantry to the center of the printer… Once it’s positioned in the center, enter G92 X in the Terminal… this will zero your X-axis… Now enter G1 X20 F300 into the terminal… Your X-axis should move to the right… if it doesn’t, you need to open your Local.cfg and scroll to the [Steppers] section… Change “direction_x = 1” to “direction_x = -1”… Restart Redeem and try these steps again. Afterwards, if your X-axis is moving to the right as it should, you can move on to the Y-axis…
Use the same method to check your Y-axis… Center the gantry… enter G92 Y to zero the axis, and then enter G1 Y20 F300 into the terminal… it should move to the rear… if not, change direction_y = 1 to direction_y = -1… Restart Redeem… check it again…
You may need to physically screw your Z-axis to somewhere around midway, so enter M18 into your terminal and turn the screw until it’s close to midway.. Once it’s there, enter G92 Z to zero your Z-axis, and then enter G1 Z20 F300… if your nozzle doesn’t move away from your bed, then you need to change direction_z = 1 to direction_z = -1 and try again the same way you did with X and Y…
If for some reason, your stepper doesn’t move when you give the *G1* commands up above, you may need to invert the endstop for that specific axis.